Does Your Kitchen Need an Update? How to Refinish Kitchen Cabinets the Right Way
- Sandy
- Sep 22, 2023
- 7 min read
Updated: Nov 17, 2023

I earn a commission if you make a purchase from any of the links in this article - but it doesn't cost you a thing! (Woot woot!) It's just a great way to say,"Thanks for the help!"
Thanks so much for supporting my family!
Renovating your kitchen can be an exciting project, but it doesn't always require a complete overhaul, and in most cases, you'll see a considerably smaller ROI on a full kitchen remodel than you will on a mid-range remodel. (See our article here for more details). Refinishing your kitchen cabinets is a cost-effective and transformative way to breathe new life into your space without the hassle and expense of replacing them. In this article, we'll guide you through the steps to refinish your kitchen cabinets and achieve a refreshed and updated look.
1. Gather Your Supplies: Before you begin, make sure you have all the necessary supplies:
Sandpaper (various grits) (use 120,
Water
Paint of your choice
Primer if you need it
Paintbrushes, paint roller or paint sprayer (See the bottom of the article for the exact products I recommend!) If you're going to use a paintbrush or paint roller, use a Purdy! They are the best paintbrush on the market that I have found, and will give you the best result a paintbrush can.
However, I really can't recommend a paint sprayer highly enough. It will give you the best finish!
Painter's tape (note - cheap painter's tape is not your friend. It's one of those things worth spending a little more on) This Frogtape brand is my absolute favorite brand and will give you the most crisp line possible.
Cabinet hardware (optional)
Old clothing
Painting mask (rated for paint - completely sealed to your face - do not use a flimsy face mask. See photo below)
New soft-close hinges (optional)
*Note: If you want your new cabinets to have that "from-the-factory" look, do not use a brush and do not use a primer that simply coats the existing finish instead of going through the prcess of sanding. You must sand them all the way down and remove all of the old paint, using progressively smaller grit. The results are fantastic and can give your home the boost that it needs to stay current*
Time-saving tip: Order your supplies ahead of time, and have everything on hand before you begin!
2. Remove Cabinet Hardware and Doors: Start by removing all the cabinet hardware (knobs, handles, hinges) using a screwdriver or screw gun. Take off the cabinet doors and drawer fronts as well. This will make the refinishing process more accessible. Be careful not to strip out the hole when removing your hardware! A great tip for keeping everything together is to use a plastic bag
3. Clean and Prep: Sand the cabinet surfaces to remove the existing finish and create a rough texture for the new finish to adhere to. Important- wear a mask and goggles! Start with a coarse-grit sandpaper and gradually move to finer grits for a smooth surface. Start with180 grit to remove grime, paint, and stain, and then follow up with 220 to get it extra smooth. If 180 is not rough enought to strip the paint off of your cabinets, start with 120 or 80 if it has a lot of layers of paint. This is also important for the cabinet boxes. Be sure to get all of the edges, and end units, and sand off any of the old stain or paint. Use the tip of your mouse sander to get in all of those corners! Make sure you cover every surface (if you have an open-plan home, cover areas around your kitchen as well) with plastic sheeting. And, give your hands a break periodically - they'll start to vibrate on their own after a while :)

4. Repair Any Damage: If there are any dents, dings, or holes in your cabinets, use wood filler to repair them. Allow the filler to dry completely, then sand it smooth.
5. Apply Primer: Most high-quality paints come with the primer already in the paint. This is sufficient if your paint is this type. If not, apply a high-quality primer to the cabinet surfaces. Primer ensures good adhesion for the paint or stain and helps block any stains or imperfections from bleeding through. Let the primer dry thoroughly. Tip: Use the paint sprayer to apply your primer. You WILL see any imperfections that are on the cabinets. So, brush strokes, grit, gloppy, uneven paint will show through the top of your paint. It has to be as smooth as glass on every layer in order to have the final finish that you want. (See the step below for more details).
6. Paint or Stain: Now comes the fun part – painting or staining your cabinets. The best (and only way) to get a true "from the factory" finish on your cabinet doors and drawer fronts is to use a paint sprayer. To do this, you'll need to set up a sealed tent space if you're working in your garage in order to keep the paint from going everywhere. If you're painting outside be sure to think about where you are in proximity to your car, your neighbor's car, and anything else that would be close enough to get a fine mist from the sprayer on it. Also, think about drying time and weather when you set up your space. The cabinets will need time to dry, you'll need at least 2 coats on each side, and it must be above 50 degrees farenheit and below 85 degrees to dry (check your paint for specifics), so if you're setting up outside, please consider the weather. You don't want to have to pull cabinet doors inside due to temperatures or rain when they're not dry yet.
Choosing your paint: You will want to choose a paint that is either Satin or Semi-gloss. These options will give you a little bit of sheen and will be washable. I used satin on the cabinets in my house. (See photo below). Here are some good paint options.
Rustoleum Cabinet Paint - comes in 5 colors
Rustoleum Ultra Cover - comes in many different colors and primer options as well
*IMPORTANT* You must wear a mask that is rated for painting and you MUST wear goggles that seal to your face. You do not want to breathe paint or get it in your eyes. Also, you will need to wear old clothing and shoes that you do not want to wear again - ever :). Shoe covers can help with not tracking paint out of the tent. You WILL be covered in paint. I also highly recommend putting your hair in a shower cap or some other protective covering, and then keeping it on with a ball cap. You won't want to be fussing with anything after you start.

Once within the completely sealed tent, set up multiple saw horses in order to do multiple cabinets at a time. Starting from off of the edge of the cabinet door, begin sweeping in a slow back and forth motion, stopping and starting past the end of the wood so you don't create uneven pools of paint on the ends. Allow for plenty of dry time in between coats, and before flipping to paint the back. This is not a one day project (unless you have, like, two cabinets :) )! Apply multiple thin coats rather than one thick coat to avoid drips and streaks. If you prefer the natural wood look, opt for staining instead of painting. If a paint sprayer is just out of the question for you, be sure to use a high-quality paintbrush, or paint roller, but even with this, you can expect to see brush strokes or some roller dappling. It will not dry to a perfect, glossy factory finish. Be sure to use a semi-gloss, or satin finish paint for durability in the kitchen. (I used a satin finish - see photos below) Also, consider using these painting stands to assist in your project to keep the cabinets from sticking to the saw horse.
Head inside to your kitchen and grab that Purdy paint roller and paintbrush. Now's the time to paint the cabinet boxes. They will turn out fine using a paintbrush and roller. Make sure the cabinet boxes have been properly sanded and cleaned of debris, then use the same paint as you did for your cabinets and paint the boxes and the molding if you aren't replacing it.
7. Dry and Reassemble: Allow the paint or stain to dry completely according to the manufacturer's instructions. Once dry, reattach the cabinet doors, drawer fronts, and hardware. Make sure everything is aligned correctly. This is also an opportunity to upgrade your hinges to add in that "soft close" feature that everyone loves. You can pick them up at the link above and give your new kitchen that extra-luxurious vibe.
8. Add New Hardware: If you want to give your cabinets a more dramatic makeover, consider adding new hardware. New knobs and handles can dramatically change the look and feel of your cabinets. Check out these fantastic finds to help modernize your kitchen. I always love a good copper pull - they bring color and class to your upgraded space (see photo below)! If you're going to change from a knob to a handle, or a handle to a knob, make that decision before you start painting! You'll need to skip back to step 4 in this article and fill in any holes that will no longer be needed, and then proceed to finish the surface so that there will be no visible variations in your finish.
9. Consider changing out the molding: The crown molding on your cabinets can date your cabinets just as much as the paint color, finish, and hardware. If you have a miter saw, or are handy with a miter box and a hand saw, this might be a project you can take on yourself. It might also be a project you'd want to hire a professional to do. Matching all of those angles just sounds like Geometry all over again to me! But, the end product is so worth it!
10. Enjoy Your Fresh Cabinets: Once everything is dry and reassembled, step back and admire your kitchen's refreshed look. Your refinished cabinets can breathe new life into the entire space, giving it a more modern and appealing appearance.
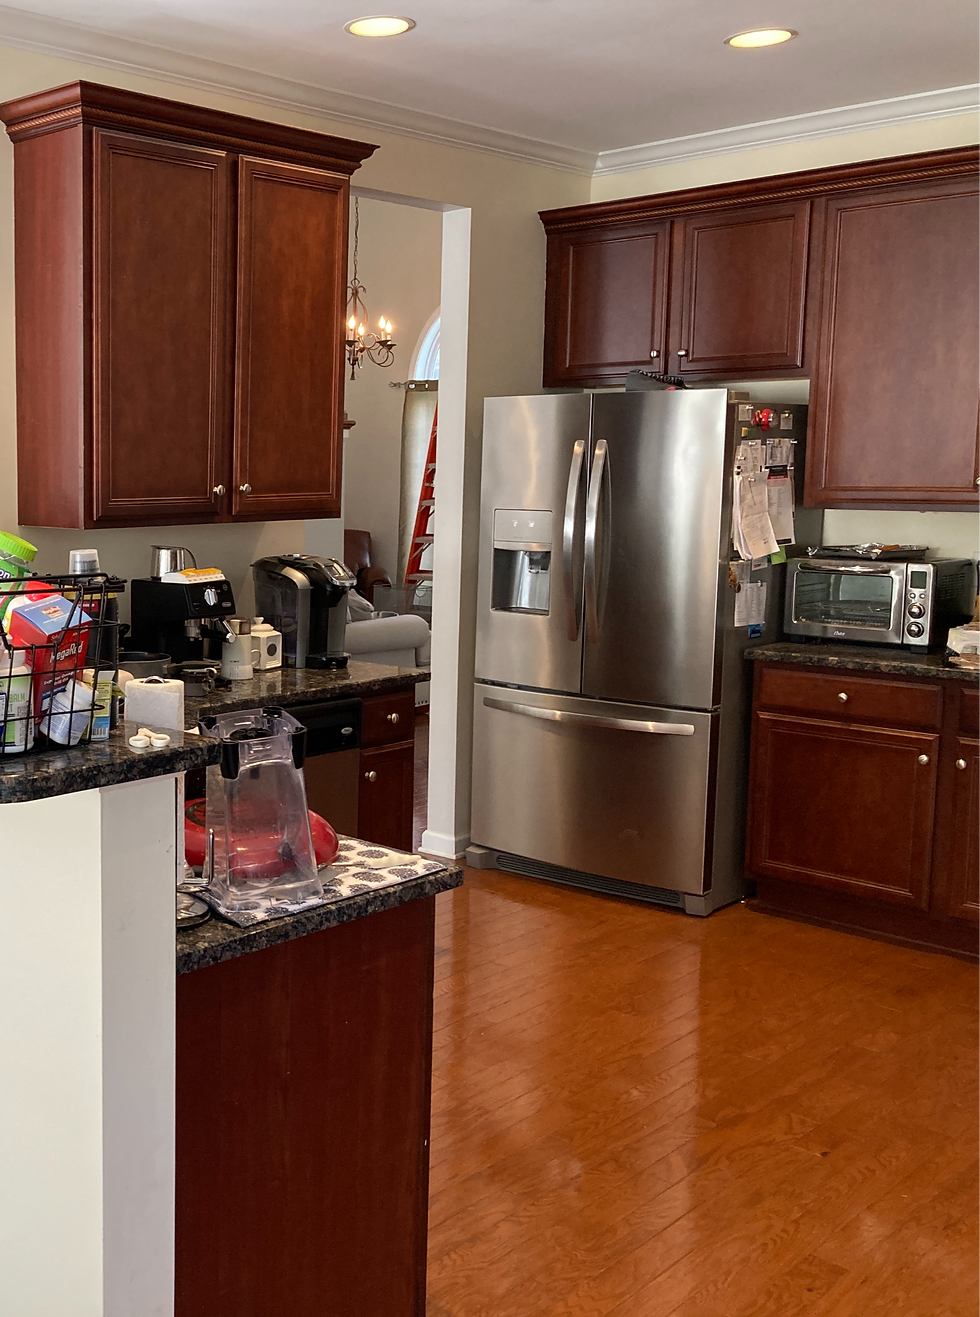
Here's are some before and after photos of my kitchen cabinets that I refinished using the steps above.


These are the tools that I recommend for getting this exact outcome for your kitchen cabinets:
Great screw gun for all kinds of household projects
Fantastic paint sprayer that you'll be able to use again and again
It's a bucket! Very exciting :)
Choose your favorite color
This paint is specifically made for cabinets
Good mouse sander for getting in the corners
Be sure to choose 1/4" nap for the smoothest finish
Hopefully this has given you some great ideas and a lot of great information to take on this project. Refinishing kitchen cabinets is a rewarding DIY project that can make a significant difference in your kitchen's aesthetics and functionality. It's a budget-friendly alternative to replacing cabinets entirely, and with the right preparation and patience, you can achieve professional-looking results that revitalize your kitchen.


